/websquare/debug.html
/websquare/fiddle/console.html
/websquare/fiddle/fiddle.html
/websquare/fiddle/fiddle_old.html
/websquare/fiddle/logAggregator.jsp
/websquare/fiddle/logClientList.jsp
/websquare/fiddle/logRetrieve.jsp
/websquare/fiddle/w2x.jsp
/websquare/mirrorView.html
/websquare/websquare.html
/websquare/websquare_sap.html
Index of /websquare
2025. 8. 14. 13:41
프록시 환경 NTP 서버 시간동기화
2025. 8. 7. 14:29
사내 프록시 환경에서 작업 시, 시스템 시간이 실제 시간과 동기화되지 않는 문제가 발생
1. 웹 서버 HTTP 헤더로 시간 동기화
sudo apt update
sudo apt install wget
2. 시스템 시간 설정
sudo date -s "$(wget --no-cache -S -O /dev/null google.com 2>&1 | sed -n -e '/ *Date: */ {s///; p; q; }')"
3. 자동화 스크립트 작성방법
nano /usr/local/bin/update_time # 스크립트 파일 생성#!/bin/bash
sudo date -s "$(wget --no-cache -S -O /dev/null google.com 2>&1 | sed -n -e '/ *Date: */ {s///; p; q; }')"실행권한 부여 :
sudo chmod +x /usr/local/bin/update_time
4. Cron으로 주기적 실행 설정(매 시각 0분)
crontab -e0 * * * * /usr/local/bin/update_time
'🚩 CTF & Dev > Dev · 스크립트' 카테고리의 다른 글
| Secure Crypto Console Tool (0) | 2025.12.01 |
|---|---|
| 서버시간동기화 (0) | 2025.10.01 |
| venv (0) | 2025.06.11 |
DuckDNS 설정
2025. 6. 21. 11:34
Duck DNS - install
linux cron if your linux install is running a crontab, then you can use a cron job to keep updated we can see this with ps -ef | grep cr[o]n if this returns nothing - then go and read up how to install cron for your distribution of linux. also confirm that
www.duckdns.org
✅ 1단계: 기존 구성 삭제 및 패키지 설치
rm -f /etc/config/ddns
opkg update opkg install ddns-scripts
✅ 2단계: 설정 파일 생성
nano /etc/config/ddns✅ 3단계: 서비스 등록 및 시작
/etc/init.d/ddns enable
/etc/init.d/ddns restart'🛠️ Infra - 구축 > 홈랩 · 인프라' 카테고리의 다른 글
| 기업 네트워크 계층 구조 정리 (0) | 2026.02.21 |
|---|---|
| [OpenWrt] WireGuard 설정 (0) | 2025.06.02 |
FRIDA 주로 쓰는 옵션
2025. 6. 12. 22:38
Android UnCrackable L2
2025. 6. 12. 22:30
venv
2025. 6. 11. 13:17
https://www.python.org/downloads/release/python-397/
Python Release Python 3.9.7
The official home of the Python Programming Language
www.python.org
# (1) 가상환경 생성
python -m venv venv
# → "venv"라는 이름으로 파이썬 가상환경 폴더를 만든다.
#   이 폴더 안에만 독립적으로 패키지가 설치된다.

# (2) 가상환경 활성화 (실행)
venv\Scripts\activate
# → "venv" 가상환경 안으로 진입.
#   (명령 프롬프트 앞에 (venv) 표시가 붙는다)

# (3) pip 업그레이드
pip install --upgrade pip
# → 패키지 설치관리 도구(pip)를 최신버전으로 만든다.
#오류난다면 아래 명령어로 실행
python -m pip install --upgrade pip

# (4) 필요한 패키지 설치
pip install -r requirements.txt
# → 현재 폴더의 requirements.txt 파일에 적힌 모든 패키지들을 한 번에 설치한다.


-----------------------------------------------------------------------
(1) 명령 프롬프트(CMD) 창을 새로 열었다면
cd 프로젝트폴더경로
# → 다시 작업할 프로젝트 폴더로 이동

venv\Scripts\activate
# → 위와 같이 가상환경을 재활성화(진입)


(2) 가상환경에서 빠져나오는 방법 (비활성화)
deactivate
# → 가상환경에서 나온다. (원래 시스템 파이썬 상태로 돌아감)'🚩 CTF & Dev > Dev · 스크립트' 카테고리의 다른 글
| Secure Crypto Console Tool (0) | 2025.12.01 |
|---|---|
| 서버시간동기화 (0) | 2025.10.01 |
| 프록시 환경 NTP 서버 시간동기화 (0) | 2025.08.07 |
Android UnCrackable L1
2025. 6. 10. 20:32
OWASP Mobile Application Security Testing Guide (MASTG)
2025. 6. 2. 18:55
[OpenWrt] WireGuard 설정
2025. 6. 2. 00:49
1단계 : 패키지 설치

2단계 : WireGuard 인터페이스 추가
1. LuCI 웹 UI → 네트워크 > 인터페이스
2. "새로운 인터페이스 추가" > 이름 : wg0
3. 프로토콜 : WireGuard VPN 선택
3단계 : WireGuard 인터페이스 (기본설정)

1. Genereate new ke pair 를 클릭 하여 키생성
2. 접근포트 51820 (기본 값)
3. IP Addresses 10.0.0.1/24 (로컬 가상 IP)
3단계 : WireGuard 인터페이스 (Peers 설정)
예시로 여러가지 목적을 가진 Peer를 생성(필요한것만 쓰면됨)
| 목적 | Peer | Address | AllowedIPs |
| 전체 트래픽 VPN 사용 | user2 | 10.0.0.2/32 | 0.0.0.0/1, 128.0.0.0/1 |
| 외부만 VPN사용 (내부제외) |
user3 | 10.0.0.3/32 | 0.0.0.0/1, 128.0.0.0/1 |
인터페이스 » wg0 » Edit peer
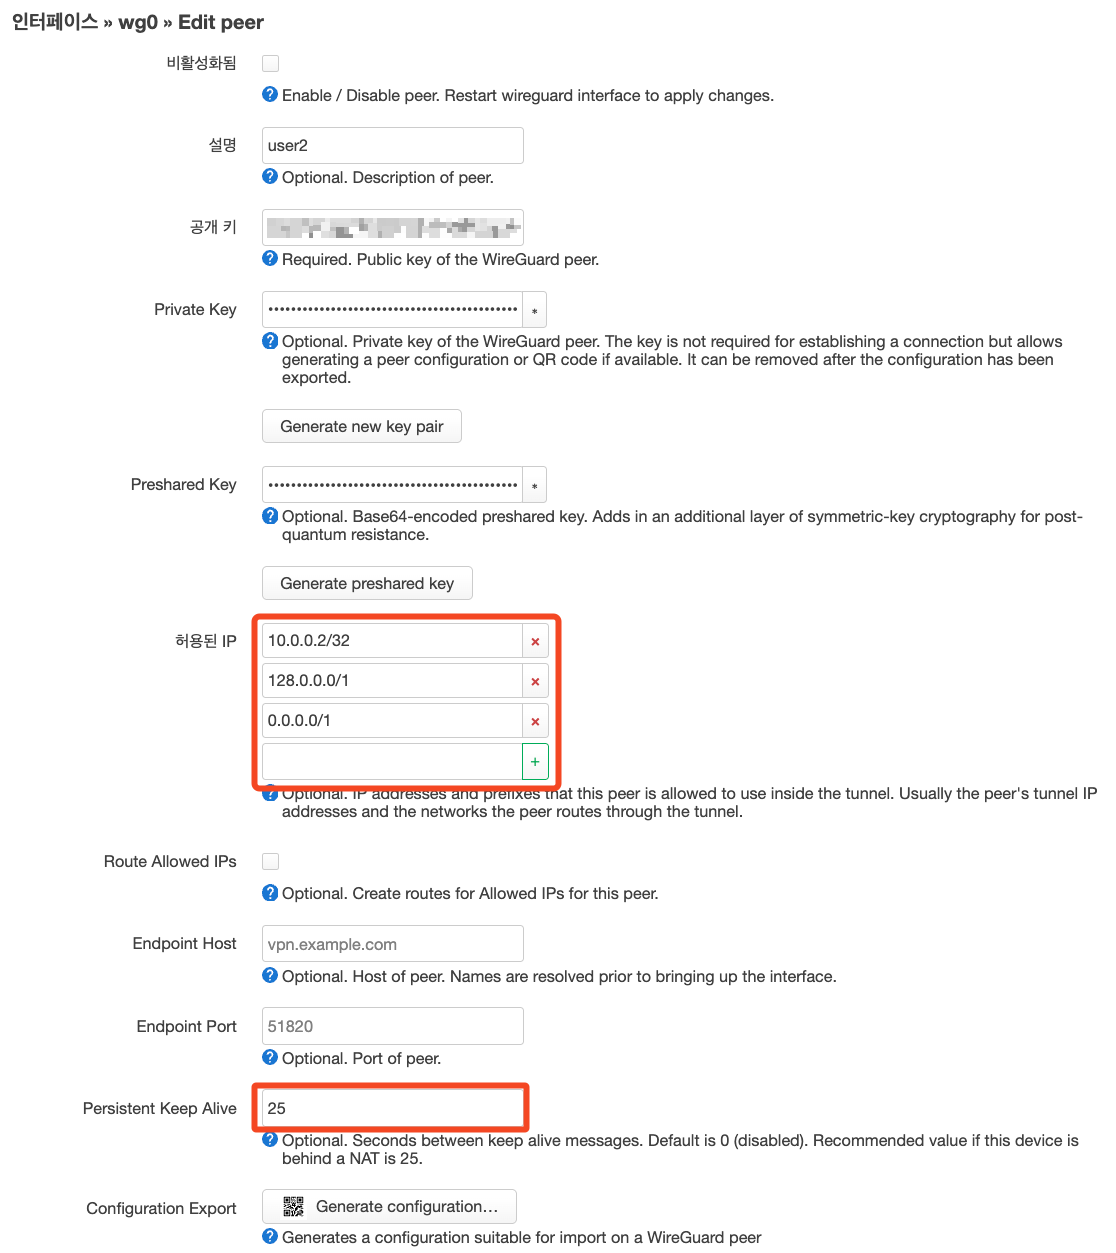
| Peer | Edit peer → 허용된 IP(Allowed IPs) 서버가 이 피어에게 어떤 IP 대역을 경유시키는지 지정 |
Generate configuration → 허용된 IP(Allowed IPs) 클라이언트가 어떤 트래픽을 이 서버로 보낼지를 의미 |
| user2 | 10.0.0.2/32, 0.0.0.0/1, 128.0.0.0/1 | 예) QR 및 공유시 주소부분에 IP 수정 10.0.0.2/32 0.0.0.0/1 (삭제) 128.0.0.0/1 (삭제) |
| user3 | 10.0.0.3/32, 0.0.0.0/1, 128.0.0.0/1 |

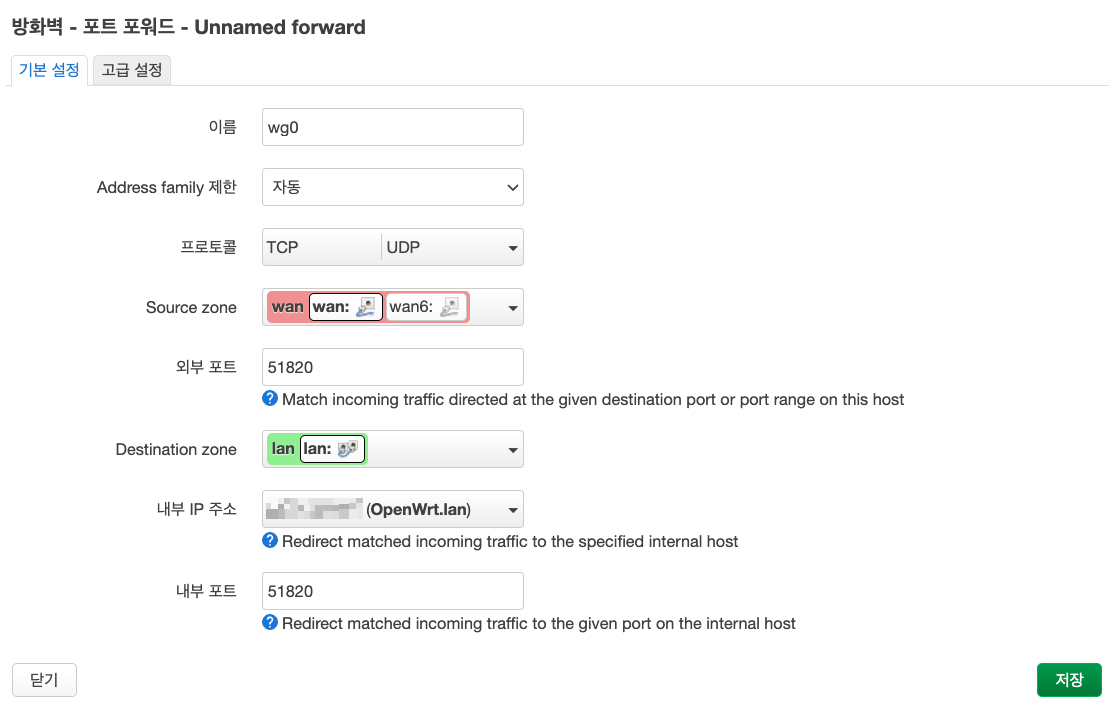
4단계 : 방화벽 설정
네트워크 > 방화벽 → 영역 (Zone)

5단계 : 방화벽 - 포트 포워드
6단계 : 내부망 접근 방지 설정(ip별로 내부망 접근 불가하도록 설정가능)

'🛠️ Infra - 구축 > 홈랩 · 인프라' 카테고리의 다른 글
| 기업 네트워크 계층 구조 정리 (0) | 2026.02.21 |
|---|---|
| DuckDNS 설정 (0) | 2025.06.21 |